Wednesday, May 17, 2017

The Methods Behind Protein Engineering

Rather than creating de novo structures out of thin air (like a greek God), protein engineering usually consists of slightly mutating natural proteins to give them more desired properties.

But what is meant by mutating and what is the desired result?

We might be getting ahead of ourselves, so let's do a refresher on how proteins work. To understand all of this you first have to know the central dogma of biology. DNA (the longterm code that determines our genetics) is transcribed into RNA (short lived code), which is translated into proteins. Proteins help build up the structure and carry out the biological functions of organisms.

A protein is made up of one or more polypeptide chain subunits. Polypeptide chains are made from linking a choice of twenty amino acids (smallish molecules) end-to-end. These subunits fold together under normal (normal = physiological, i.e inside the body) pH and temperature conditions into a specialized structure. This specialized structure performs a certain function in a cell or organism. 
Always remember, in Biology, the form of an object is associated with the function of the object. Structure is everything.

When building a protein there are 20 amino acids to choose from:
1. Glycine, (Gly, G)
2. Alanine (Ala, A)
3. Valine (Val, V)
4. Leucine (Leu, L)
5. Isoleucine (Ile, I)
6. Tryptophan (Trp, W)
7. Phenylalanine (Phe, F)
8. Tyrosine (Tyr, Y)
9. Threonine (Thr, T)
10. Serine (Ser, S)
11. Cysteine (Cys, C)
12. Methionine (Met, M)
13. Glutamatic Acid/Glutamate (Glu, E)
14. Glutamine (Gln, Q)
15. Arginine (Arg, R)
16. Aspartic Acid/Aspartate (Asp, D)
17. Asparagine (Asn, N)
18. Lysine (Lys, K)
19. Histidine (His, H)
20. Proline (Pro, P)
The general form for an amino acid.
An amino acid has four basic parts surrounding a central alpha carbon: an amine group, a carboxyl group, a Hydrogen, and a wild card R groupThe carboxylic group of one amino acid links with a following amino acids' amide group to form a peptide bond. A series of these peptide bonds forms a peptide chain. This is a protein's primary structure. If our protein was a piece of clothing, we might say that its primary structure is a single strand of thread that makes up the clothing.
An Alpha Helix
The chain will then fold into what is called secondary structure. The most common secondary structure types are the alpha helix and the beta sheet. The alpha helix looks like a right handed stair case that twists upwards by 3.5 residues per turn. The R groups of each residue (amino acid) stick out the sides of this long winding twist. The beta sheets look like wavy sheets stacked on top of each other. For our clothing metaphor, the secondary structure might be small knots and loops in the thread.
Image result for beta sheet
A beta sheet
Image result for beta sheet
Another representation of a beta sheet.
The tertiary structure is the overall 3D globular structure of a protein. This is the point where proteins really start looking like, well, proteins. There is a 3D structure. For our clothing metaphor, you can imagine the tertiary structure is the formation of a pant leg. Some proteins only go up to this tertiary structure.
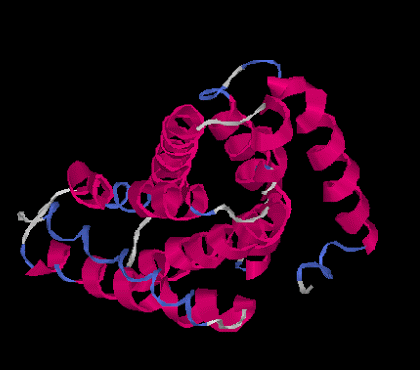
Image result for tertiary structure
Tertiary Structure

Sometimes, but not always, tertiary structure pieces made of different peptide chains come together to form quaternary structure. You can think of this as pant legs and other pieces coming together to make a pair of functional jeans. The pieces are from a different strand of thread (a different peptide chain), but the parts work together.
Image result for tertiary structure
Hemoglobin is protein with Quaternary structure.


Sources:
https://upload.wikimedia.org/wikipedia/commons/7/74/Alpha-amino-acid-general-2D.png\
https://upload.wikimedia.org/wikipedia/commons/7/75/Alpha_helix.png
https://upload.wikimedia.org/wikipedia/commons/thumb/c/c9/Alpha_sheet_bonding_schematic-color.svg/1004px-Alpha_sheet_bonding_schematic-color.svg.png
https://upload.wikimedia.org/wikipedia/commons/b/b8/Beta-meander1.png
https://upload.wikimedia.org/wikipedia/commons/2/2d/I-Tasser_Predicted_Tertiary_Structure_1.png
https://upload.wikimedia.org/wikipedia/commons/2/26/225_Peptide_Bond-01.jpg


Sunday, March 19, 2017

Top 10 Bioinformatics Resources for Students to Get Started

  1.  The NCBI Help Manual
    • for using BLAST, PubMed, and Entrez
  2. Rosalind
    • for hands on python learning and practice bioinformatics problems
  3. Tutorials Point for Python
    • all the basics of python
  4. 100 + Challenging Python Exercises
    • To master the python language in practice
  5. Ryans Tutorials on Linux Systems
    • for starting on linux
  6. Linux CheatSheet
    • an easy reference
  7.  Introduction into Bioinformatics by Lesk (pick most current version you can afford)
    • to understand some of the fundamental algorithms used in bioinformatics
  8.  The Dictionary of Algorithms and Data Structures
  9. The Blog that Plays Music and Teaches You Algorithms
    • learn what many algorithms and data structures are for so you can use them when needed for a project
  10. A Guide to Bioinformatics Self Learning
    • MIT based courses on Bioinformatics

The Basics of Extracting DNA from Liquid Media (Old School)

Today's focus is on isolating DNA from bacteria.

I'll outline the basic steps, sans detailed numbers.

Note: This overview uses phenol and chloroform, which are both  dangerous substances. Only work with these substances if you are trained, have the proper safety gear ( gloves, lab coat, safety googles and a fume hood), emergency resources, and if there is someone else in the lab with you. (Never work alone.)

Step 1: Spin

Starting with a solution of cells in media derived from one colony, spin the cells in a centrifuge till the pellet is at the bottom of the tube.  The fluid that remains is called the supernatant. Discard it without disrupting your pellet. Don't feel guilty.

Step 2: Rip Cells Apart with a Lysis Buffer
Mix  a few milliliters (say.. 10 ml)  of Lysis Buffer:
100 mM EDTA, 
10 mM Tris (pH 7.5)
 and 1% SDS. 

Add a roughly equal amount of lysis buffer as you have bacteria. Using a pestle and vortexor, grind up your cells into they are completely lysed and stop begging for mercy. Spin this solution down and keep the supernatant.

Step 3: "Coagulate" Proteins and Start Isolating Nucleic Acids with Phenol

Now add an equal volume of phenol as your supernatant.  Mix by inversion a couple of times. Spin solution. Pipette the top layer into a new tube. Discard the rest.

Step 4: Use 1:1 Phenol Chloroform

Add 1:1 phenol chloroform in equal volume to solution. Mix again by inversion. Spin. Then pipette off top layer to keep.

Step 5: Repeat One More time, but now with 100% Chloroform
Add chloroform in equal volume solution. Mix again by inversion. Spin. Pipette off top layer to keep.

Step 6: Add 7.5 M NH4OAc
Pipette  1/2  of your  solution volume of 7.5 M NH4OAc to your solution.

Step 7: Add ethanol

Add enough ethanol to reach a 66% ethanol solution. Invert a few times.

Step 8: Wait patiently

Wait about 10 minutes with your solution at room temperature (It is recommended for steps that you do things on ice to prevent degrading DNA accept for when re-suspending your DNA pellet at the end.) Twiddle your thumbs.

Step 9: Spin Spin Spin

Spin sample until your DNA pellet is on the side of the tube. Decant ethanol without disrupting or moving your pellet.

Step 10: Wash with 70% ethanol.

Add 70% ethanol. Centrifuge and then decant supernatant carefully without harming your pellet.

Step 11: Dry and Wet Again

Let ethanol evaporate off the tube.  Then re-suspend DNA in 20-100 ul of TE buffer or distilled water lab grade water. Give the DNA time to dissolve into solution.


Once the DNA is isolated, check the concentration using a Nanodrop. A Nanodrop is a spectrophotometer that can measure the concentration of DNA, protein, or RNA, using a beam of light and Beer's law. In essence, the Nanodrop measures the absorbance of light caused by a small droplet of your solution. Then it uses an equation to calculate the concentration of your substance based on how much light got absorbed by the particulates in your droplet.


Resource and For Further Reading:  http://palumbi.stanford.edu/SimpleFoolsMaster.pdf


Tuesday, January 17, 2017

Easing Aging by Yamanaka Factors?

Article Highlight Reel of the Week:


This week I'm focusing on the article: "In Vivo Amelioration of Age-Associated Hallmarks by Partial Reprogramming" which was published in Cell recently. 


Here is the background you need to know to understand this paper:


Stem cells are a type of cell that can develop into different types of cells. Put simply, a pluripotent stem cell has a lot of potential to be just about anything when it grows up. Like a child pondering what he or she can be, it has many paths it can take in development before it turns into its final adult career*. However, as it differentiates and goes down the path to maturity, its options of what it can be dwindles. Once it is a mature cell, it can't revert back to its pluripotent state (without some help from scientists).

The potency of a stem cell refers to how many possible types of cell your stem cell could become. If the maturing cell is unipotent, that means it must be at stage of differentiation where it can only become one cell type. If it is pluripotent, it can become just about any cell type in the body.

There are three sources of stem cells known. Those are: adult stem cells (which you have right now), embroyonic stem cells (which are derived from a 5 day old blastocyst), and induced pluripotent stem cells (iPSC) which are the subject of this paper.

Shinya Yamanaka won the Nobel Prize in medicine in 2012 for discovering four genes that when expressed can take a mature cell back to its pluripotent stem cell stage. The problem is these cells, though they appear to be brought back to a state of youth, can grow into cancer. So, the simple idea of applying Yamanaka factors haphazardly just doesn't work.


Here are the highlight discoveries:


Scientists from the Salk Insitute figured out that they could turn the Yamanka genes on and off before cells reached a totally pluripotent state (in which the cells could turn to cancer).

The way they did this was by designing mice with Yamanaka genes which could be activated or repressed when the mice ingest a substance in their water. They activated Yamanaka genes for two days and repressed them for five in cyclic fashion.

Mice who had progeria, which is a disease that causes one to age quickly, lived 30% longer than their average lifespan. Normal mice showed less aging characteristics. However, this beneficial effect did not last long after treatment stopped.
Image result for progeria
Child With Progeria

So, in brief, this study showed that cyclicly turning on Yamanka factors appears to slow aging in mice.


Why it's a Cool Paper:


The problem of pluripotent stem cells forming cancer cells has been a key issue of applying iPScs in human health care.

Even though we won't be doing gene editing on people to replicate this experiment, this study can be a springboard to study how epigenetics (a subfield of genetics which studies how genes get turned on and off at certain times for certain reasons) relates to aging. Who knows? Perhaps from this knowledge a sensible antiaging therapy could develop in the future. 

But no antiaging water just yet...


Additional Sources and Reading:
Image Source: The Cell Nucleus and Aging: Tantalizing Clues and Hopeful Promises. Scaffidi P, Gordon L, Misteli T. PLoS Biology Vol. 3/11/2005, e395 doi:10.1371/journal.pbio.0030395


*(ignore the fact that most people have many careers in their lifetime for metaphor sake)